iOS Quick Start
elepay iOS SDK は elepay を iOS アプリに導入するための SDK です。
このガイドでは、elepay の SDK を iOS アプリと連携する方法について詳しく説明します。
対応バージョン
- elepay iOS SDK 4.0 からは、iOS 11.0 のサポートが対象外となりました。また、Bitcode のサポートも終了しました。
- elepay iOS SDK 3.0 からは、iOS 10.0 のサポート対象外になりました。
- elepay iOS SDK 2.x は、iOS 10.0 以上と互換性があります。
- 開発環境:Xcode 11.0 以上をご使用ください。
インストール方法
1. Cocoapod によるインストール
- Podfile に
ElepaySDKを追加します。
ご注意:Cocoapods 1.10.0 以上をご利用ください。
# バージョンが2.2未満のElepaySDKはdynamic frameworks形式のみ対応しています
# 2.3からのstatic frameworks形式の導入も対応しました
#use_frameworks!

# From 2.0.0, the SDK renamed from ElePay to ElepaySDK

pod 'ElepaySDK', '~> 3.0'- 中国のペイメント(Alipay, WeChat Pay, Union Pay)を利用する場合のみ、
Elepay_ChinesePayments_Pluginも追加します。
# From 2.0.0, the SDK renamed from ElePay-ChinesePayments-Plugin to Elepay_ChinesePayments_Plugin

pod 'Elepay_ChinesePayments_Plugin', '~> 2.0'- Stripe を利用する、かつ elepay SDK が 2.2.0 以上の場合のみ、
Stripeを追加してください。 ご注意:ElepaySDK 2.x を利用する場合は、pod 'Stripe', '~> 19.4.1'で Stripe を追加してください。
# Only ElepaySDK 3.0 and above supports Stripe 21.x
# Use "pod 'Stripe', '~> 19.4.1'" if you are using ElepaySDK 2.x

pod 'Stripe', '~> 22.0'
🚧 Stripe v23 が iOS 12 のサポートを停止したため、elepay SDK では Stripe v22 までを設定してください。
- PayPal を利用する、かつ elepay SDK が 1.7.0 以降の場合のみ、
Braintreeを追加してください。 ご注意: elepay SDK 4.0.0 からは Braintree のサポートが終了しました。PayPal を利用する場合は、elepay SDK 3.x をご利用ください。
pod 'Braintree'pod installを実行します。
2. Swift Package Manager (SPM)によるインストール
elepay iOS SDK は 3.1.1 から SPM に対応しました。
elepay iOS SDK Chinese Payments Plugin は 2.0.2 から SPM に対応しました。
- SPM に ElepaySDK を追加します。
こちらの URL をご利用ください:
https://github.com/elestyle/elepay-ios-sdk.gitバージョンを指定する場合は、3.1.1 以降をご指定ください。 - 中国のペイメント(Alipay, WeChat Pay, Union Pay)を利用する場合のみ、
Elepay_ChinesePayments_Pluginも追加します。 こちらの URL をご利用ください:https://github.com/elestyle/elepay-ios-sdk-chinesepayments-plugin.gitバージョンを指定する場合は、2.0.2 以降をご指定ください。 - Stripe を利用する場合は、
Stripeを追加してください。 こちらの URL をご利用ください:https://github.com/stripe/stripe-ios.gitバージョンを指定する場合は、21.8.1 以降をご指定ください。 - PayPal を利用する場合は、
Braintreeを追加してください。 ご注意:Braintreeの最新版 5.x.x は iOS 11 の対応が終了したため、4.x.x をご利用ください。また、4.x.x は SPM に対応していないため、Cocoapods で導入するか、手動でインストールしてください。
3. 手動インストール
7 ステップで、 elepay SDK for iOS をアプリに導入できます。
- Github.com で
ElePaySDK.zipをダウンロードして解凍します。 ElePay.frameworkを Xcode のプロジェクトに追加します。必要に応じて「Copy items if needed」をチェックしてください。- ターゲット設定に、
ElePay.frameworkを「Embedded Binaries」に追加します。 - Objective-C のプロジェクトで Apple Pay を利用する場合、ターゲット設定に
PassKit.frameworkを「Embedded Binaries」に追加する必要があります。
4. Objective-C プロジェクトで利用する場合
📘 Objective-C で開発する場合
Objective-C のプロジェクトに elepay を実装する場合、こちらの ElePayObjCBridge.swift ファイルをご利用ください。
実装
1. URL Scheme の追加
Xcode で、PROJECT > TARGETS 項目> Info タグにある URL Types を開いて、elepay 専用 URL Scheme を追加してください。
共通の設定
elepay 専用の URL Scheme の取得方法は「iOS / Android SDK 用 URL Scheme の取得」へご参照ください。

URL Scheme のテスト
モバイル Safari や Chrome のアドレスバーに上記の URL Scheme(例:ep1a2b3c4d5e://)が正しく App を呼び出されるかどうかをテストできます。
📘 重要
複数の TARGETS が存在する場合、全てのターゲットの URL Type に、上記の URL Scheme を追加してください。
2. 各支払方法の設定に関して
決済方法ページをご参考ください。
3. 初期化
プロジェクトの application(_:didFinishLaunchingWithOptions:) 関数に、以下の初期化コードを追加します。
Elepay.initApp(key: "ELEPAY_APP_PUBLIC_KEY")📘 Public Key について
ELEPAY_APP_PUBLIC_KEYを「elepay 管理画面」で発行したものに変更してください
4. callback の設定
application(_:open:options:) -> Bool 関数に, 以下のコードを追加します。
func application(_ app: UIApplication, open url: URL, options: [UIApplicationOpenURLOptionsKey : Any] = [:]) -> Bool {
    // Let elepay Handle Result Callback from 3rd party payment Apps first.
    if (Elepay.handleOpenURL(url)) {
        // When ELEPay has already handled the URL, make sure your code returns here.
        return true;
    }

    // for no payment URL handle it in your own code here.
    return false;
}
5. 支払い処理(都度決済)
お客様サーバー側処理
elepay API のチャージ API /api/charges で都度決済を開始します。
当 API は認証が必要なため、認証用のセキュリティーキーを契約者が管理しているサーバーに保存して、そのサーバーから請求してください。
❗️ セキュリティー:
安全のために、セキュリティーキーは絶対にアプリに保存したり、転送したりしないでください。
ネーティブ App 側処理
elepay API のチャージ API から取得したペイロードを、以下のコードのように elepay SDK に送信して、elepay SDK からのコールバックに支払い完了(失敗)後の処理コードを追加します。
以下3つの中で使いやすいメソッドをご利用ください。
1. JSON String でチャージする場合:
_ = Elepay.handlePayment(
  chargeJSON: jsonString,
  cardParams: elepayCardParams, /* <- Optinal parameter, can be removed */
  viewController: viewController) { result in
    switch (result) {
    case let .succeeded(paymentId):
        // your code for handling successful situation
    case let .canceled(paymentId):
        // your code for handling canceled by user
    case let .failed(paymentId, error):
        // your code for handling failure situation
    }
}| パラメータ名 | 説明 |
|---|---|
| chargeJSON | ペイメントデータが含まれた String 型の JSON オブジェクトとなります。サーバー側により作成され、elepay iOS SDK はこのデータで決済処理を行います。 |
| cardParams | クレジットカードの UI をコントロールするオプショナルパラメータです。デフォルトは nil です。nil の場合、SDK 内部のクレジットカード UI が使われます。 |
| viewController | 決済を行う際に UI を表示するために使われた UIViewController の実例となります。 |
| completion | 決済の結果を通知するコールバックです。 |
2. JSON Data でチャージする場合:
_ = Elepay.handlePayment(
  chargeData: jsonData,
  cardParams: elepayCardParams, /* <- Optinal parameter, can be removed */
  viewController: viewController) { result in
    switch (result) {
    case let .succeeded(paymentId):
        // your code for handling successful situation
    case let .canceled(paymentId):
        // your code for handling canceled by user
    case let .failed(paymentId, error):
        // your code for handling failure situation
    }
}| パラメータ名 | 説明 |
|---|---|
| chargeData | ペイメントデータが含まれた Data 型の JSON オブジェクトとなります。サーバー側により作成され、elepay iOS SDK はこのデータで決済処理を行います。 |
| cardParams | クレジットカードの UI をコントロールするオプショナルパラメータです。デフォルトは nil です。nil の場合、SDK 内部のクレジットカード UI が使われます。 |
| viewController | 決済を行う際に UI を表示するために使われた UIViewController の実例となります。 |
| completion | 決済の結果を通知するコールバックです。 |
3. JSON Dictionary でチャージする場合:
_ = Elepay.handlePayment(
  charge: jsonDictionary,
  cardParams: elepayCardParams, /* <- Optinal parameter, can be removed */
  viewController: viewController) { result in
    switch (result) {
    case let .succeeded(paymentId):
        // your code for handling successful situation
    case let .canceled(paymentId):
        // your code for handling canceled by user
    case let .failed(paymentId, error):
        // your code for handling failure situation
    }
}| パラメータ名 | 説明 |
|---|---|
| charge | ペイメントデータが含まれた Dictionary 型の JSON オブジェクトとなります。サーバー側により作成され、elepay iOS SDK はこのデータで決済処理を行います。 |
| cardParams | クレジットカードの UI をコントロールするオプショナルパラメータです。デフォルトは nil です。nil の場合、SDK 内部のクレジットカード UI が使われます。 |
| viewController | 決済を行う際に UI を表示するために使われた UIViewController の実例となります。 |
| completion | 決済の結果を通知するコールバックです。 |
6. 支払い処理(定期払い・ウォレット決済)
お客様サーバー側処理
elepay API のソース API customers/<_customerId_>/sources でソース登録を開始します。
当 API は認証が必要なため、認証用のセキュリティーキーを契約者が管理しているサーバーに保存して、そのサーバーから請求してください。
ネーティブ App 側処理
elepay API のソース API から取得したペイロードを、以下のコードのように elepay SDK に送信して、elepay SDK からのコールバックに支払い完了(失敗)後の処理コードを追加します。
以下3つの中で使いやすいメソッドをご利用ください。
1. JSON String でソースを取得した場合:
_ = Elepay.handleSource(
  sourceJSON: jsonString,
  cardParams: elepayCardParams, /* <- Optinal parameter, can be removed */
  viewController: viewController) { (result) in
    switch (result) {
    case let .succeeded(sourceId):
        // your code for handling successful situation
    case let .canceled(sourceId):
        // your code for handling canceled by user
    case let .failed(sourceId, error):
        // your code for handling failure situation
    }
}| パラメータ名 | 説明 |
|---|---|
| sourceJSON | ソースデータが含まれた String 型の JSON オブジェクトとなります。サーバー側により作成され、elepay iOS SDK はこのデータで決済処理を行います。 |
| cardParams | クレジットカードの UI をコントロールするオプショナルパラメータです。デフォルトは nil です。nil の場合、SDK 内部のクレジットカード UI が使われます。 |
| viewController | 決済を行う際に UI を表示するために使われた UIViewController の実例となります。 |
| completion | 決済の結果を通知するコールバックです。 |
2. JSON Data でソースを取得した場合:
_ = Elepay.handleSource(
  chargeData: jsonData,
  cardParams: elepayCardParams, /* <- Optinal parameter, can be removed */
  viewController: viewController) { (result) in
    switch (result) {
    case let .succeeded(sourceId):
        // your code for handling successful situation
    case let .canceled(sourceId):
        // your code for handling canceled by user
    case let .failed(sourceId, error):
        // your code for handling failure situation
    }
}| パラメータ名 | 説明 |
|---|---|
| sourceData | ソースデータが含まれた Data 型の JSON オブジェクトとなります。サーバー側により作成され、elepay iOS SDK はこのデータで決済処理を行います。 |
| cardParams | クレジットカードの UI をコントロールするオプショナルパラメータです。デフォルトは nil です。nil の場合、SDK 内部のクレジットカード UI が使われます。 |
| viewController | 決済を行う際に UI を表示するために使われた UIViewController の実例となります。 |
| completion | 決済の結果を通知するコールバックです。 |
3. JSON Dictionary でソースを取得した場合:
_ = Elepay.handleSource(
  source: jsonDictionary,
  cardParams: elepayCardParams, /* <- Optinal parameter, can be removed */
  viewController: viewController) { (result) in
    switch (result) {
    case let .succeeded(sourceId):
        // your code for handling successful situation
    case let .canceled(sourceId):
        // your code for handling canceled by user
    case let .failed(sourceId, error):
        // your code for handling failure situation
    }
}| パラメータ名 | 説明 |
|---|---|
| source | ソースデータが含まれた Dictionary 型の JSON オブジェクトとなります。サーバー側により作成され、elepay iOS SDK はこのデータで決済処理を行います。 |
| cardParams | クレジットカードの UI をコントロールするオプショナルパラメータです。デフォルトは nil です。nil の場合、SDK 内部のクレジットカード UI が使われます。 |
| viewController | 決済を行う際に UI を表示するために使われた UIViewController の実例となります。 |
| completion | 決済の結果を通知するコールバックです。 |
Checkout 機能
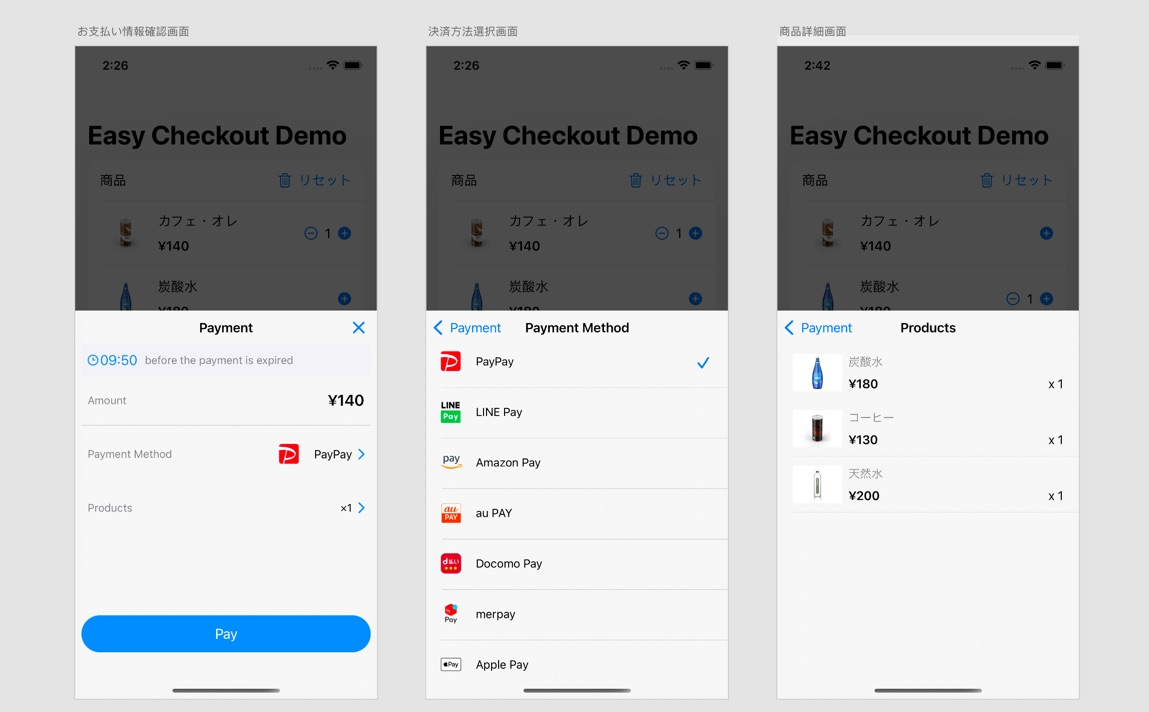
Checkout 機能を利用すると、決済方法選択画面の開発を省くことができ、elepay SDK に提供している支払い方法選択画面などを利用可能になります。
決済方法のイメージは下のスクリーンショットにて確認できます。ダークモードにも対応しています。
サーバー側処理
elepay API のコード API からチェックアウト用のペイロードを作成します。
ネーティブ App 側処理
elepay API のコード API から取得したペイロードを、elepay SDK に送信し、elepay SDKより checkout 処理を完成させます。
ペイロードのタイプに合わせて3つのメソッドを提供します。 サンプルコードとメソッドの説明は下記です。
1. JSON String でチェックアウトする場合:
Elepay.checkout(
  checkoutJSONString: checkoutJSONString,
  from: viewController
) { result in
   switch (result) {
   case .succeeded(let codeId):
     // checkout is succeeded.
   case .cancelled(let codeId):
     // checkout is canceled.
   case let .failed(let codeId, let error):
     // checkout is failed.
   }
}| パラメータ名 | 説明 |
|---|---|
| checkoutJSONString | checkout データが含まれた String 型の JSON オブジェクトとなります。サーバー側により作成され、elepay iOS SDK はこのデータで決済処理を行います。 |
| from | 決済を行う際に UI を表示するために使われた UIViewController の実例となります。 |
| resultHandler | 決済の結果を通知するコールバックです。 |
2. JSON Data でチェックアウトする場合:
Elepay.checkout(
  checkoutJSONData: checkoutJSONData,
  from: viewController
) { result in
   switch (result) {
   case .succeeded(let codeId):
     // checkout is succeeded.
   case .cancelled(let codeId):
     // checkout is canceled.
   case let .failed(let codeId, let error):
     // checkout is failed.
   }
}| パラメータ名 | 説明 |
|---|---|
| checkoutJSONData | checkout データが含まれた Data 型の JSON オブジェクトとなります。サーバー側により作成され、elepay iOS SDK はこのデータで決済処理を行います。 |
| from | 決済を行う際に UI を表示するために使われた UIViewController の実例となります。 |
| resultHandler | 決済の結果を通知するコールバックです。 |
3. JSON Dictionary でチェックアウトする場合:
Elepay.checkout(
  checkoutJSON: checkoutJSON,
  from: viewController
) { result in
   switch (result) {
   case .succeeded(let codeId):
     // checkout is succeeded.
   case .cancelled(let codeId):
     // checkout is canceled.
   case let .failed(let codeId, let error):
     // checkout is failed.
   }
}| パラメータ名 | 説明 |
|---|---|
| checkoutJSON | checkout データが含まれた Dictionary 型の JSON オブジェクトとなります。サーバー側により作成され、elepay iOS SDK はこのデータで決済処理を行います。 |
| from | 決済を行う際に UI を表示するために使われた UIViewController の実例となります。 |
| resultHandler | 決済の結果を通知するコールバックです。 |
エラー処理
SDK が各種類のエラー(ElepayError)がコールバックします。
ユーザー体験がよくなるため、case unsupportedPaymentMethod(errorCode: String, paymentMethod: String)のエラー情報をユーザーに表示する事をお薦めします。
サンプルコード
switch (result) {
case .succeeded(let codeId):
    // checkout is succeeded.
case .cancelled(let codeId):
    // checkout is canceled.
case let .failed(let codeId, let error):
    switch error {
    case let .unsupportedPaymentMethod(errorCode, method):
        if errorCode == "10110" {   // 3rd party App not installed error
            print("The \(method) App is not installed for payment processing. Please install the app first or selected another payment method.")
        } if errorCode == "10100" {   // The device or the iOS system is too old to use this payment method
            print("Your device is too old to use \(method)")
        } else {    // Other error codes. Such as: a new payment method not supported by current SDK. The App using elepay SDK need to be updated
            print("Your App need to be updated to use \(method)")
        }
    default:
        // other error handling code
    }
}
エラーコード にエラーコードリストをご参照ください。
注意事項
🚧 支払い結果の処理について
アプリ内の支払い結果は、ユーザーへの結果照会のみでご使用ください。実際の課金結果は必ずサーバー上の callback API を経由し、elepay サーバーから送信されたデータでご確認ください。 詳しくは elepay API ガイドをご確認ください。
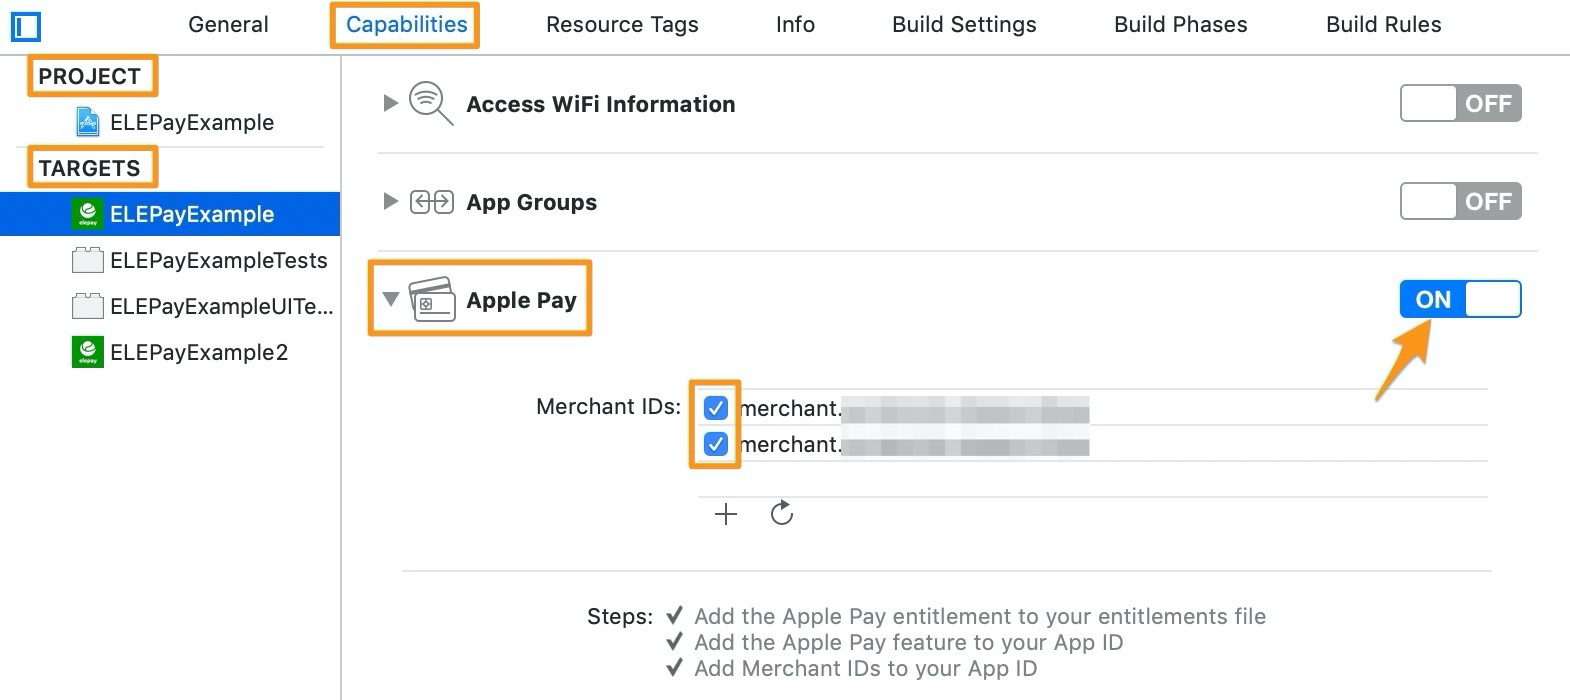
1. Apple Pay について
- Apple Pay を実装するときは、Xcode の PROJECT → TARGETS にある Capabilities タグをクリックして、Apple Pay を「ON」に設定してください。
- Apple Pay の証明書を「elepay 管理画面」-「開発設定」-「Apple Pay」にアップロードしてください。 証明書の作成方法はこちらのドキュメントでご参照ください。
2. LSApplicationQueriesSchemes(iOS 9 及び以降のシステム)について
各決済アプリに遷移するために、Xcode の PROJECT → TARGETS にある Infoタグ(或いは Info.plist)で、LSApplicationQueriesSchemes Key を追加してください。
<key>LSApplicationQueriesSchemes</key>
<array>
    <string>**各アプリのSchemeを追加してください**</string>
</array>
各支払方法の設定に関して
決済方法ページをご参考ください。
多言語
elepay iOS SDK は多言語に対応しています(現状は English, Japanese, Simplified Chinese, Traditional Chinese に対応しています)。
SDK のデフォルトは iOS のシステム設定と一致した言語を表示します。
表示言語の指定
システム設定値と異なる言語を表示したい場合、以下のコードで表示したい言語を指定してください。
ElepayLocalization.shared.switchLanguage(code: .ja)	// Use Japanese
ElepayLocalization.shared.switchLanguage(code: .en)	// Use English
ElepayLocalization.shared.switchLanguage(code: .cn)	// Use Simplified Chinese
ElepayLocalization.shared.switchLanguage(code: .tw)	// Use Traditional Chinese
この switchLanguage 関数は何回でも使えます。関数を呼び出した後に表示される画面が指定した言語で表示します。
📘 一部の画面の表示言語がご指定出来かねます
一部の決済方法は第三者画面に遷移する事があります。その画面は elepay SDK の制御範囲外のため、ご指定の言語と異なる言語で表示する可能性があります。
最終更新日